
Clarity in Darkroom: Enhance Details in Your Photos
We’re excited to expand our editing capabilities with one of the most requested features: Clarity! After months of research, iteration, and optimization, we promise the wait was worth it.
What is Clarity?
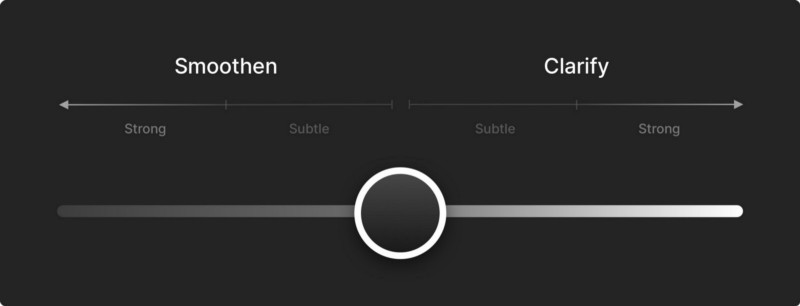
Clarity adjusts the contrast within the details of your image, without affecting the overall tone of the image.
As you adjust Clarity, the details are either clarified or smoothened, but the whites and blacks remain unaffected, and sharp edges remain sharp.
Want fewer details in a face to smoothen it? Decrease Clarity. Want more to enhance the drama or texture? Increase Clarity.

The Clarity slider is logarithmic, in the range of -50 to +50, the effect is subtle. As you drag towards the edges, the impact of Clarity is expanded. This gives you the ability to either make subtle adjustments for portraits, or go beyond for dramatic landscapes using one single & smart tool.
Please note, that Clarity only works on macOS Big Sur 11.2 and earlier. This is due to a bug in the latest version of Big Sur which prevented us from shipping Clarity. We’re in contact with Apple about a fix, and will release an update whenever we confirm it works again.
Let’s discuss how this works in practice.
Emphasizing Details
We naturally filter out un-important details to avoid overwhelming our ability to interact with the world. This is biologically useful for making our way around the world safely, but as photographers, we can take advantage of this to define the narrative and direct the eye of the viewer.
Clarity, by increasing contrast in the details, makes them more prominent. In the image of the flower below, it draws your eyes to the texture in the petals, to the creases in the leaves.
This works especially well in photos of nature, landscapes, and animals:

Skin Adjustments
We are also highly attuned to notice the details and features on people’s faces; small changes have a big impact into how you perceive a face. Given how common portrait photos are, they deserve a deeper discussion on their own.
Much like we discussed in the previous section, you could certainly enhance these details if you want to bring attention to the wrinkles in someones face or their facial features. Think documentary photography, or photojournalism (within journalistic reason).
However, digital cameras can be quite good at picking up too much detail. If you want to focus on the person’s expression and their environment, not harsh lighting or other facial features, then reducing Clarity will smoothen skin, while keeping hair, eyes, and other features sharp and clear.

What kind of magic is this?
Under the hood, Clarity is powered by a seriously smart mathematical algorithm called Fast Local Laplacian Filter. This algorithm enables us to do two things:
Pull out only the details from the image
The first big step we take is to calculate which pixels in your photo are details, and which are tone-regions. We do this by generating a Laplacian Pyramid. In an oversimplified way, we first blur the image, then mathematically subtract it from the original, leaving us with the detail map. We can then operate directly on those details.

Adjust pixels relative to their surrounding pixels
Once the details are separated from the image, we can adjust the contrast of each region in the image separately. This is where the “local” in Local Laplacian Filter comes from, and it ensures the edges in the image remain sharp.
![]()
Once the details are adjusted, we rebuild the image by re-introducing the color and tone regions.
Meet the Math
It took quite a few very smart people to figure out all of the above. For the curious, we based our implementation on this abstract and paper. Or watch the video below that also describes what the Fast Local Laplacian Filter does.
Improvements to Portrait Depth editing
With our focus on stability and quality in recent releases, this release also includes big speed improvements to Portrait Depth editing. Changing the blur is much faster, zooming in and making edits is now just as fast regardless of zoom level, and when saving during export, we now preserve the depth mask.
Darkroom+ Bonus
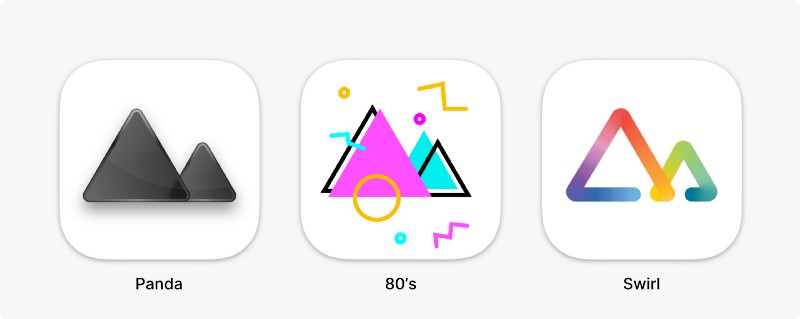
We added 3 new app icon variants, available to our Darkroom+ subscribers. Panda provides a clean black and white version of our current icon. 80’s harkens back to Apple’s brief foray into apparel in the 1980’s. And the Swirl was inspired by Apple’s recent playful and colorful April Spring event. Bringing the total number of icons to choose from to 18!
If there’s something you’d like to see in the future please let us know by sending us an email or tweet at us on Twitter. For a full detailed list of all changes please visit our updates page.
As always, we’re very thankful for your continued loyalty and support, and look forward to sharing everything else we have in store for you.
The Darkroom Team

