Adopting a Workflow
The sixth installment in our weekly series exploring mobile photography through the lens of Darkroom
We’ve covered basic photography techniques, and started talking about how to use Darkroom’s Curves editor to fine-tune your photos. There’s a lot more to be said on each of those topics, and we’ll get to them, but first, I thought it would be helpful to stay high-level and cover our bases. This week, we’ll go over how to adopt a mobile photo editing workflow. Most of you probably already have a workflow, and hopefully this article will give you some insight into how you can optimize it.
Why Workflows Matter
It used to be that a single roll of 35mm film got you 36 photos, you got them processed, then shared the ones you liked. If you used 120mm Medium-Format film, you had 12 photos. You really needed to think about what you were photographing and whether it was worth the cost and the space on the roll. That thought process did a lot of the filtering and pre-selection, and you ended up with photos on your roll that you felt compelled by.
With digital cameras, and particularly smartphone cameras, our camera rolls are packed with near-duplicate photos. You want to photograph your coffee? It may take 3–4 photographs to get the perspective right, then you might try 2 or 3 different compositions, and your camera roll now has 30 photos of a single, now cold, latte. Going on a hike? a birthday party? Shoot, now you have 200 photos to go through. Having to go through them all, find the ones you like, and start editing them could take the fun out of the process altogether. When you consider how much time and work is involved with editing each one… fuggedaboutit!
Central to Darkroom are two principles: Workflow efficiency and Creative Control. There are some apps that excel at creative control, and other that excel at workflow management. It was our principle that without full editing control, a workflow would not be efficient, and vice versa. Darkroom’s innovating “No-Import Editing” and lightweight no-commitment editing makes photo editing as fast as photo browsing.
So, with that said, let’s start talking about why a workflow is important and how to start adopting one.
The Funnel Approach
There isn’t a single “correct” workflow, and different workflows optimize for different variables, with experimentation, find the one that works for you!
The approach we’ll be covering today mimics a funnel. The goal in the first part of the process is to go through all your photos, find the ones that you want to edit, then dig deep onto those photos.
If you’re particular about the photos you take when you’re in the camera, this workflow may not be ideal for you, but you’d also be a person of intense constraint. How do you not keep snapping?
Darkroom doesn’t have every photo editing feature. This was done on purpose, to focus the product and to ensure everything is done tastefully (Also, only 1 person working on a photo editor means time constraints :P). This workflow involves multiple apps.
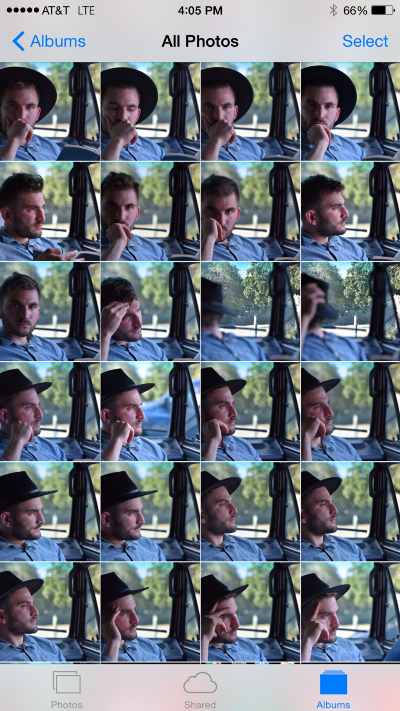
Step One: What Photo to Edit?
So you found a beautiful wall, your friend posed for you, and you took 12 photos waiting to get the right pose and lighting. The first step is to look through the photos you’ve taken, and figure out which is the one you want to share. Most people’s workflow starts with the Photos app for this reason. The Photos app is by far the fastest and most efficient for this specific task, but how do you get that photo into your workflow? The Photos app has some basic editing controls, but they’re designed for the lay-man who wants to do some basic quick adjustments, not a mobile photographer who’s trying to establish a personal style.
When we were doing some research in the early days of Darkroom, we heard a lot of horror stories from photographers who each had their own solutions to the problem. In one particularly extreme example, the photographer would go through their photos in the Photos app, find the one they want to edit, then rotate it, so when they open VSCOcam to edit, they can identify it and un-rotate it there. Another photographer would copy the photo in the Photos app then start their editing process in Snapseed where they can paste it.
The inefficiency here is pretty evident, and one of the core reasons why we started Darkroom. In Darkroom, all your photos are always there, no-import needed. Further more, getting in an out of a photo is as easy as a tap, and a swipe down. While you’re editing, you can swipe back and forth through your library.
What makes Darkroom different than the Photos app however, is how much power it puts immediately under your finger. Part of the process of determining which photo to edit from a set of near-duplicate photos is some basic editing. Maybe cropping and rotating helps you determine if that one photo is salvagable. Maybe some brightness and contrast does the trick. Darkroom blurs the line between photo browsing and professional-grade photo editing in a way that helps you do this faster than you’ve ever been able to before.
That’s why Darkroom makes sense as the first app in your workflow
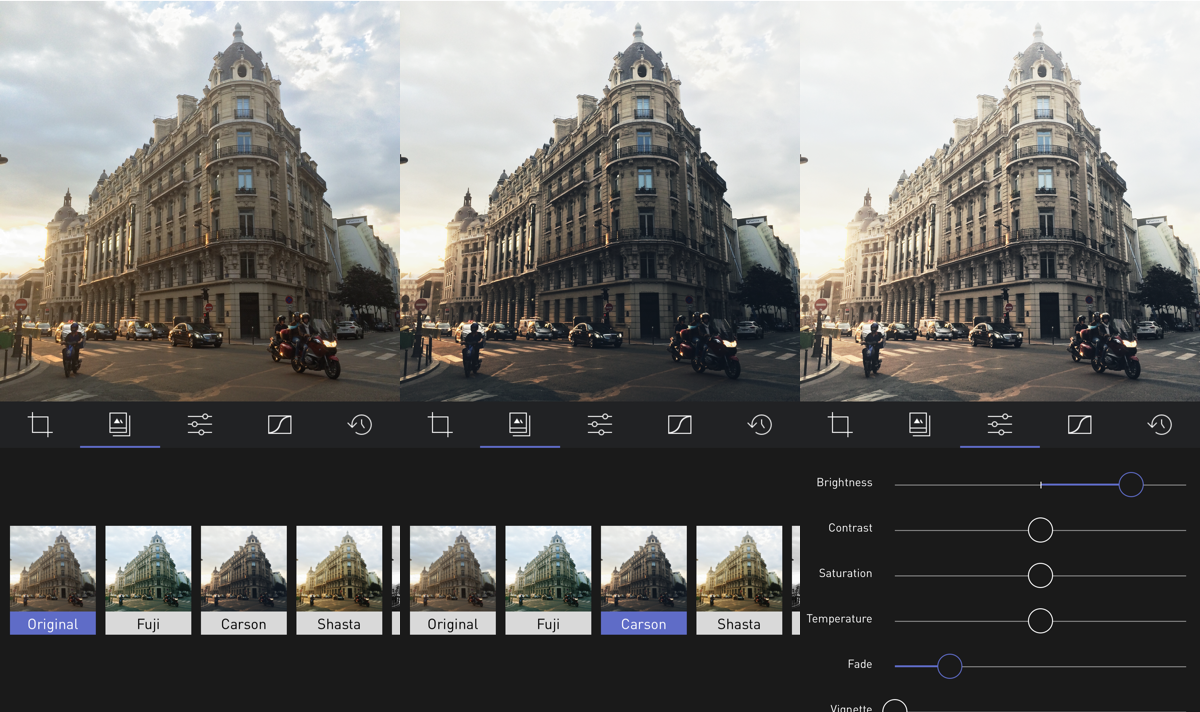
Step Two: Structure, Color, and Light
Today, Darkroom specializes in a specific subset of photo editing: Light and Color. The first step when a photo is selected is to get the right rotation and crop. The order of the tools in Darkroom reflects this workflow. In Managing Composition, we talked about classic compositions in photography. If you’ve messed up, this is your chance to fix it. The various aspect ratios impact how the composition is perceived, and the pre-defined aspect ratios ensure you tell and accurate and consistent story.
Next, you try to land on a filter and get the look you want. There’s not much to say here, just tap on the filters until you find one you like or you’ve created. Once you land on a look, the color channel curves, temperature, and saturation are where you play next with color, getting the right tone and emotion. The filter is doing the heavy lifting here, but each photo is different, and your interpretation of the filter is unique to you. That’s what makes editable filters in Darkroom so powerful. The filter should fit your photo, not the other way around!
Finally, the Basic Adjustments Tool (The sliders) is where you play around with light. This involves a combination of Brightness, Contrast, and the RGB curve adjustments. The peculiarities and details involved probably deserve their own Darkroom Sunday School post. On a basic level, you can correct for exposure and contrast.
Ok now you’ve got the right light and color in your photo. Great. Hopefully you’ve enjoyed the process. At this point, you have a choice to make. If the photos looks great, you can just share it directly from Darkroom. If it still needs work, you can save it to the Camera Roll and pick up in another app. What else is there to do, you ask?
Step Three: Cleaning Up
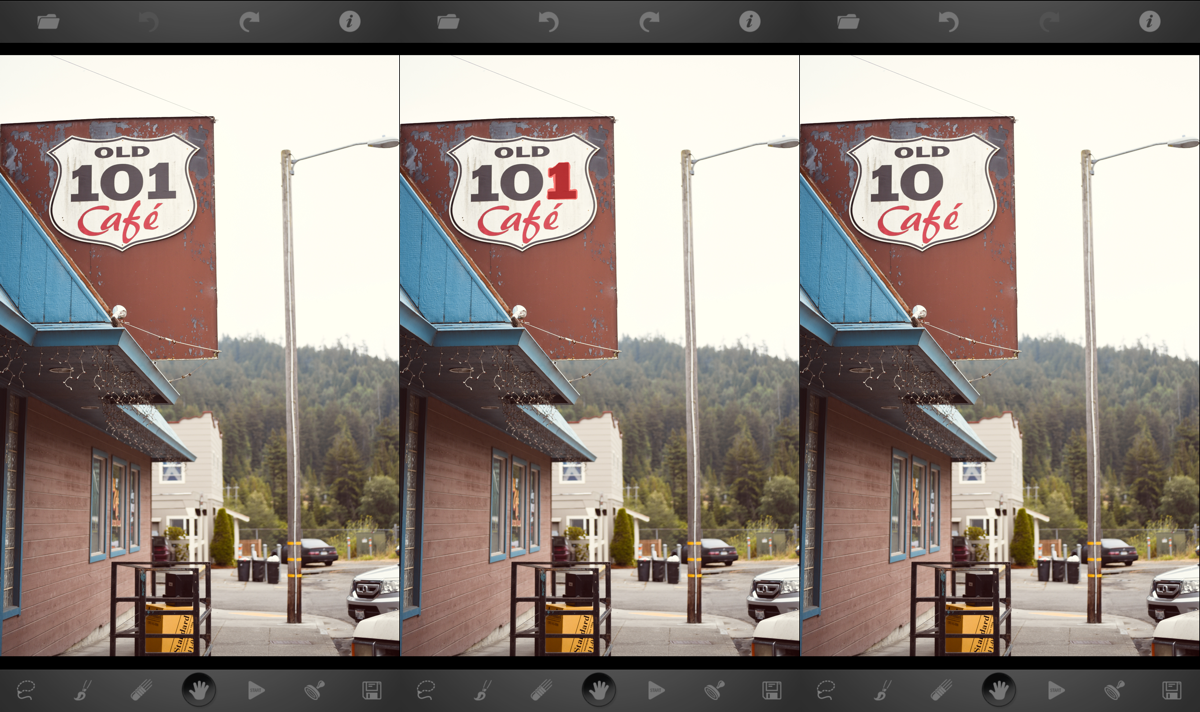
One of my favorite apps is touchRetouch. It’s a spot-removal app that, once you get used to, you’ll always want to keep close by. It’s a fairly straightforward process to use it, though predictably tap-heavy.
The variety of situations where you’d want to remove spots is surprisingly common: Birds in the sky, trash on the street, rocks in the sand, a protruding light pole in your composition, a parked car, even a whole building sometimes!
When you know what your focal point is, and what story you want to tell, these unwanted elements could get in the way, and increase the amount of visual noise in your photos. By removing them, you end up with a clean photo that tells a stronger story.
To remove a spot, tap “Open photo from gallery”, select the photo you just exported from Darkroom, then select the “Highest” setting (See what I mean by tap-heavy?), and you’re in. There are only really three buttons that you need to know about: The brush, the eraser, and the start button (The triangle). Zoom in on the section that contains the spot, use the brush to draw around it, then hit “Start”, and watch it do its magic. You may need to undo, use the eraser to fix issues, and try again, but you can experiment and see where its boundaries are. When you’re done, the Floppy Disk icon is where you go to share.
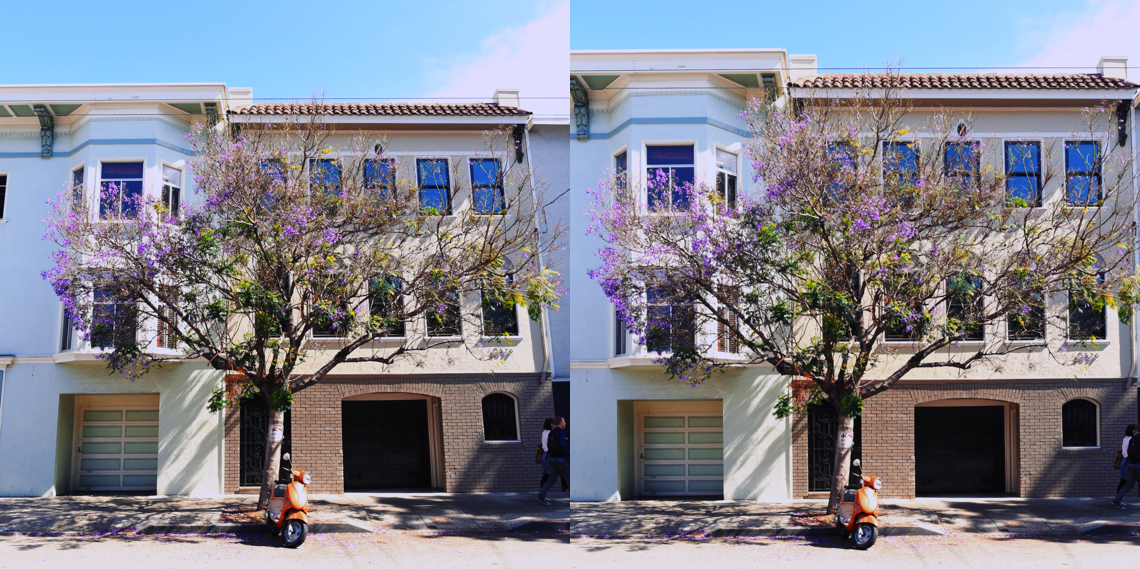
Step Four: Perspective
A proper perspective can make the difference between a good and a great photo. If you’re sharing to Instagram, at this point you can go straight to Instagram and edit perspective in the “Adjust” tool of the upload process, but I prefer the control that SKRWT (I pronounce it as “Skroot” but, “Screw it” works too, I hear).
Again, the app is unnecessarily tap-heavy, but it gets the job done. Importing a photo to SKRWT is pretty simple, and the two main tools of import are vertical and horizontal perspective. The goal here is, if you have a right angle, make sure it’s actually a right angle. This involves a combination of vertical and horizontal perspective correction. Play around, practice makes perfect!
Step Five: Attention Whore
Share to Instagram and start counting likes. Most people won’t know how much work went into the photo, but they’ll appreciate and ogle, and you’ll know. Oh, you’ll know, because the likes are flooding your inbox.
Addendum
Ok so, it’s a lot of work. I know. Yes, those other apps aren’t great. Having three duplicates isn’t great. The suggested solutions to these problems seem like temporary hacks, which they are. Right now, today, this is what we have though. I am confident the future will be brighter though ;)

